Installing WordPress

  1. Once logged at https://digitalscholar.rochester.edu you’ll be at the homepage of your control panel. Scroll down and look under Web Applications, then click the WordPress button.
  2. This page gives you more information about the WordPress software. To begin the install click Install this Application in the upper-righthand corner.
  3. On the next page, the installer will ask for some information about this install. The first thing you’ll want to do is decide where to install it. For example, you could install it in a subdomain you have created by selecting it from the drop-down menu. You also have the option of installing WordPress in a subfolder by typing in the folder name in the Directory field. Click here for more information about subdomains.
  4. By default the installer will automatically backup your website and update it anytime a new version comes out. While we recommend you keep this option, it is possible to only do minor updates, or turn them off completely. The installer will also create a database for you automatically, but if you’ve already created one for this website you can choose Let me manage the database settings and enter the details. Finally, you’ll need to create an initial username and password for the WordPress install. Enter that information in the final section and click Install.
  5. The installer will take just a few moments to install WordPress and a progress bar will keep you updated. When it is complete, you will see a link to your new WordPress site as well as a link to the backend administrative section for your WordPress site.

Congratulations, you’ve now installed WordPress! Now you can start customizing it with themes, plugins, and more.

Working with Omeka Classic

Here are a few tips and tricks that can help make sure you get the most out of the Omeka software.

ImageMagick

Omeka requires the ImageMagick library in order to resize and generate thumbnails for your images. University of Rochester provides ImageMagic for all accounts, but occasionally you will need to manually enter the server path to the utility. The setting for this is located under the Settings > General tab and the path to ImageMagick is /usr/bin

image

PHP-CLI

Some plugins including CSV Import and Neatline may need to execute code using the command-line version of PHP. If your plugin requires this it can be enabled by editing the config.ini file in your File Manager under application>config.

Navigate to the line that reads:

background.php.path = “”

Change it to the following:

background.php.path = "/usr/bin/php-cli"


Map Your Domain to Blogger

Mapping your domain is an important part of sites.haverford.edu; it reinforces the idea that you don’t necessarily need to host all your own applications. You should, however, be mindful of making your web presences part of a domain you control. If you would like to map a subdomain and have not yet created it, use this tutorial on creating subdomains before proceeding. To map your domain, or a subdomain, to Blogger, use these steps:

  1. Log in and navigate to your cPanel. Click the Search box at the top, right-hand corner and type “DNS” (without the quotes).
  2. Click on the Zone Editor icon.
  3. Find the domain (or subdomain) you want to map to Blogger in the list and click Manage.
  4. Create a new CNAME record by clicking Add Record. To save, click Add Record.Keep this window open; you will need it in later steps.
  5. In a new window, go to the Blogger website, and login with your Blogger/Google username and password.
  6. From your Blogger Dashboard, find the blog you’d like to use, expand the More Options menu, and click Settings.
  7. On the “Basic Settings” page, find the Publishing section, and click the Setup a 3rd party URL for your blog link.
  8. Under Advanced Settings, type the full subdomain or domain you are mapping into the box, leave the Use missing files host? option set to No, then click Save.
  9. You will be presented with a message that your domain cannot be verified, along with information about your existing DNS entry, and an additional DNS entry that needs to be made. This is normal. Copy the second entry under the Name, Label, or Host entry to your clipboard.
  10. Go back to the window or tab containing the Zone Editor in your Digital Scholar cPanel. Create another records by clicking Add a Record. Paste the text you just copied into the Name field. This information will be different for each domain. Set the TTL field to 14400, and the Type drop-down menu to CNAME
  1. Go back to the window or tab containing the Blogger Advanced settings panel, and copy the second entry under the Destination, Target, or Points to column to your clipboard.
  2. Go back to the window or tab containing the Advanced DNS Zone Editor in your digitalscholar.rochester.edu cPanel. In the Zone File Records section, find the domain you were editing Action for and paste the text you just copied into the CNAME field. This information will be different for each domain. Click Add record when you are done.
  3. Return to the window or tab containing the Blogger Advanced settings panel, and click Save.
  4. If everything was successful, your domain will now appear as the Blog Address. Keep in mind that it may take up to 72 hours for your domain or subdomain to correctly point all visitors to the correct location.

For further instructions, click here.

What are the technical requirements/limitations of State University?

University of Rochester uses a Web server known as a LAMP server. “LAMP” is an acronym for the technology stack that is installed on the server:

  • Linux: This is the open-source operating system that is used on the server.
  • Apache: This is the Web server software that the server uses.
  • MySQL: This is the database software that the server uses.
  • Php/Perl/Python: These are the three programming languages that the server can interpret.

Generally, if you are using applications available to install by default through the digitalscholar.rochester.edu, you shouldn’t need to worry about these technical details. All of the software that is available for installation (in cPanel) meets the technical requirements.

If you’re interested in finding/installing another application (that isn’t available through our automatic installer tool), then you’ll have to be sure that the server can support it. To start with, you’ll want to be sure that the Web application can run on a LAMP server. Check the technical requirements for the application to determine this. You’ll also need to do some research about whether there are any additional services or modules required on the server. Some software may require components that aren’t included in the default installation of the LAMP stack. In that case, contact us with details about what you need, and we’ll see what we can do.

General Settings: Title and Tagline

Now that you have your WordPress installed and running, it’s time to look at some basic settings for your site.

  1. The place that you will access the settings for your site is called the Dashboard, and it provides the starting point for accessing all of your sites dials and knobs.Screenshot of WordPress dashboard
  2. The setting we will look at here is your blog “title” and “tagline”. It is located in Settings > General. Once you’re on the General Settings page, you can give your blog any title you want. You can also give your blog a tagline, which can be a short description of the blog.

When you change the Blog title and tagline, they will show up at the top of your site. Depending on what theme you use, the title and taglines will show up in various places. In the case of some themes, they might not show up at all depending on whether they allow custom configurations. We won’t worry about that for now.

There are more settings on the General Settings page, such as setting the administrative email account, time zone, date format, etc. Change those to whatever is appropriate for your site and geographical location.

Installing Scalar

  1. To get started you’ll need to login to your control panel (https://digitalscholar.rochester.edu/dashboard) using your University of Rochester username and password.
  2. Navigate to the Application section and select Scalar. You can also use the search function as well.scalar installer icon
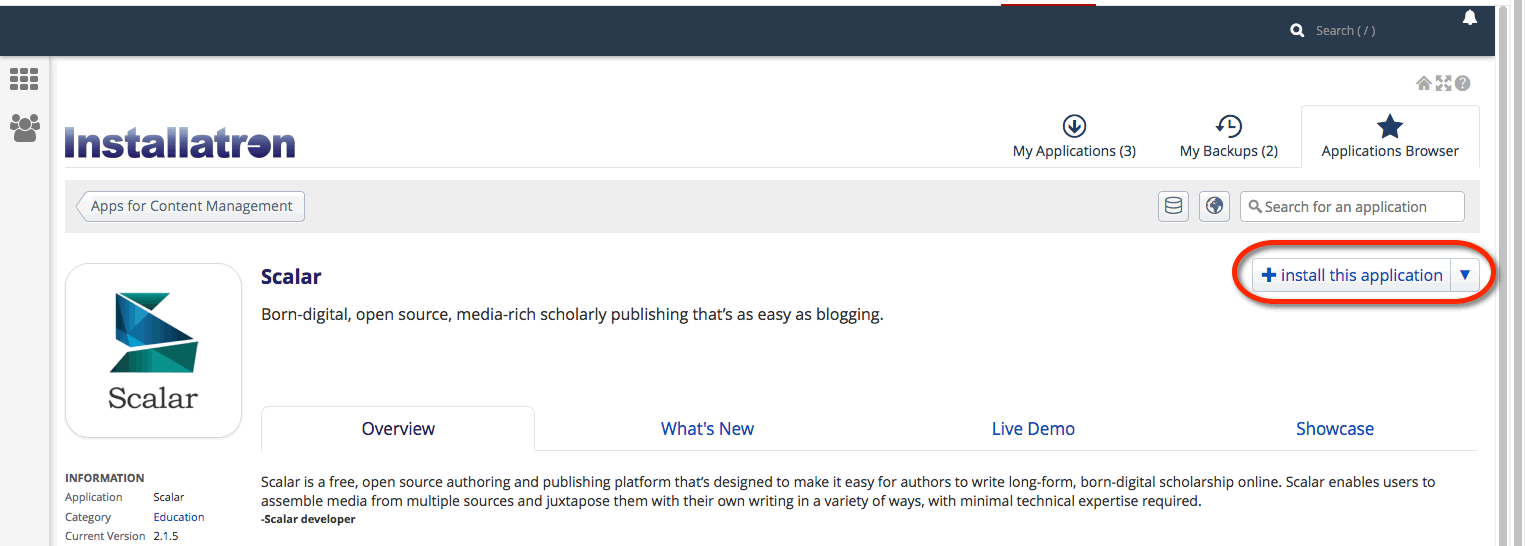
  3. When you click on the Scalar icon, you will be taken to the Scalar information page. Click install this application.install Scalar
  4. On the next page, fill in the different fields accordingly:
    -Select the domain or sub-domain where you’d like your Scalar site to live. You can create a sub-domain by following directions in the section Setting up Subdomain. The directory is optional. If you are using a sub-domain, you may not need to use a sub-directory. You can learn more by reading Subdomains vs Subdirectories.

    -Under version, select the version that is most recent.
    -By default the installer will automatically backup your website and update it anytime a new version comes out. While we recommend you keep this option, it is possible to only do minor updates, or turn them off completely.
    -The installer will also create a database for you automatically, but if you’ve already created one for this website you can choose Let me manage the database settings and enter the details.

    -Finally, in Settings, you’ll need to create a username and password for the Scalar install. A password can be generated for you, but you should try to create your own.
  5. Click Install.
  6. Once the installer is finished loading, you will be taken to the My Apps section of the dashboard. Here you’ll find links to login to your scalar installation.
  7. Log into your new Scalar instance with the credentials you set during the install process.

Map Your Domain to Tumblr

Mapping your domain is an important part of sites.haverford.edu; it reinforces the idea that you don’t necessarily need to host all your own applications. You should, however, be mindful of making your web presences part of a domain you control. If you would like to map a subdomain and have not yet created it, use this tutorial on creating subdomains before proceeding. To map your domain, or a subdomain, to Tumblr, use these steps:

  1. Log in and navigate to your cPanel. Click the Search box at the top, right-hand corner and type “DNS” (without the quotes). As you type, the cPanel page will begin to narrow down results.
  2. Find and click on Zone Editor to continue.
  3. Find the domain, or subdomain, you want to map to Tumblr in the list of Zone File Records. Click Manage next to the proper domain.
  4. Leave the Name, and TTL fields set to their defaults. Update the Type drop-down menu to CNAME, and the Address field to domains.tumblr.com. Click Edit Record when you are done.
  5. Visit the Tumblr website, and login with your Tumblr username and password.
  6. After logging in, click the Tumblr Settings icon.
  7. For the Tumblog you’d like to use under the Username click the pencil icon to edit these settings.
  8. Check the Use a custom domain checkbox. Type the name of the domain or subdomain you want to map to Tumblr into the box, then click Test your domain.
  9. If your domain mapping was successful, you’ll see a message that your domain is now pointing to Tumblr. Click the Save button before leaving the page. Keep in mind that it may take up to 72 hours for your domain or subdomain to correctly point all visitors to the correct location.

LAMP Environments

When you sign up for an account on Stateu.org, you get a personal space our web host. There are a few things you need to know about the Web host that will make it easier to understand what you can do with your new space.

The Web Server

The Web server is the main computer that is associated with the digitalscholar.rochester.edu hosting account. It is literally a computer that has special software on it that allows it to be accessible via the Web. The files that run your applications, images, video, or any other files you upload into your Web space are stored on this server.

(For comparison’s sake, your desktop or laptop computer, by default, doesn’t allow this; I can’t access files on your computer through a Web browser by default. You can actually install Web server software on your own computer, however, essentially making your files accessible over the Web.)

In order to run properly, a Web server has to have an operating system installed and some kind of Web server software. Our University of Rochester hosting environment runs the LINUX operating system and an APACHE Web server.

The Database Server

In addition to the Web server, there is also an associated database server. This is another computer, but it is configured with software that allows it to host databases. It is also connected to your Web server so that your applications (hosted on the Web server) can retrieve data (from databases hosted on the database server).

Databases come in many varieties. The kind of database you can use for a Web application depends on the kind of software that’s installed on the database server. Our University of Rochester hosting environment runs MYSQL databases.

The Programming Language

When you install open-source software on your Web account, it’s going to be written in a programming language. Our University of Rochester hosting environment has software installed on it that allows it to understand different programming languages. If you install software that’s written in a language that your Web server doesn’t read, it won’t work.

The Digital Scholar hosting environment can currently interpret PHPPERL, and PYTHON.

Add it Together: LAMP

If you take a look at all the descriptions above, you can determine that we are running what is known as a LAMP server for digitalscholar.rochester.edu:

  • Linux (operating system)
  • Apache (Web server)
  • MySQL (database server)
  • PHP/PERL/PYTHON (programming language)

Applications that are written for LAMP environments will, presumably, run on the server. However, some applications do require additional extensions or libraries that aren’t included in a LAMP environment by default. The applications you can install via Installatron (in cPanel) should work just fine.

LAMP environments are unique because all components are open-source, meaning Linux, Apache, MySQL, PHP, PERL, and PYTHON are open for anyone to use for free. Anyone can also modify them and redistribute them. As a result, there are lots of online resources for using these systems that have been built by their communities of users. But, also as a result, since you’re not paying for these systems, you can’t just call up a company and ask them to fix a problem.

WordPress Themes

When it comes to WordPress, customizing the look of your site is simple and straightforward. When you install WordPress, the default (or pre-set) theme is called Twenty Seventeen (as of WordPress version 4.8). It is a very customizable theme.

You can find general information about Twenty Seventeen here.

In addition to Twenty Seventeen, you’ll have other themes available to you. (What themes you have depends upon if you did a default WordPress installation, or if you installed a special package.) If Twenty Seventeen doesn’t meet your needs, you can activate another theme on your site or install a completely new one.

Activating Themes

  1. Start at your site’s Dashboard.
    Screenshot of WordPress dashboard
  2. Navigate to Appearance > Themes.
    screen shot of WordPress theme options
  3. You will see thumbnail images representing each of the themes that you currently have available on your site. Simply mouse over any one of them, and click the Activate link.
    screen shot of activating different wordpress theme

That’s all you need to do to change the look of your site with a new theme.

Installing Themes

If none of the themes that were provided when you installed WordPress are what you’re looking for, you can always search for and install other themes from the WordPress Theme Repository.

  1. Navigate to Appearance > Themes.
    screen shot of WordPress theme options
  2. Installing new themes is quite simple. You start by going to the Add New Button.
    Screen shot of
  3. The initial page is the Search Theme page, and it’s not visually helpful. You can check a few filter boxes to see what comes up, but there is a more visual way. Click the Featured link at the top and you’ll get visual (screenshot) examples of other themes you can install. You can also click Newest or Recently Updated.
  4. Under the thumbnail picture of each theme (when you hover your mouse over the theme) are three choices – InstallPreview, and Details & Preview. Those choices should be pretty self-explanatory so click Install to add a new theme to your site.
  5. After you install the theme, it is still not active on your site. You will need to Activate it to use it.
    Activate desired theme by clicking

Once activated, your site will be using the new theme. Visit your site’s homepage to view your new theme.

Creating a Book

To get started in Scalar, you will need to create a book.

  1. Go to your Scalar site via the My Apps link or the Scalar URL you established during the setup process.
    Access Scalar site and click the Sign-in link
  2. Log in to Scalar using the username and password you set up during the installation process.
    log into scalar with your email and Scalar password
  3. Go to the top right corner and click, Dashboard.
    Scalar landing page and dashboard link
  4. Select the My Account tab and at the bottom of the page type in a title for your book. This can be changed at a later time if needed. Click Create.
    Scalar create new book
  5. You now see your book in the “My books” list. From there you will be able to build your Scalar book.