Reading Settings – Front Page

WordPress is a very flexible platform for creating full-blown websites, not just blogging sites. This page will show you how to change the “front page” of your website.

As we have said before, WordPress provides two primary content types for you two work with: posts and pages. Posts, as in blog posts, are a somewhat complex form of a webpage. Each blog post gets published in reverse chronological order, on the front page of a WordPress site. You write a new post, and it gets published at the top of the front page. Pages are a more static form of content. They are additional areas to put information that doesn’t change much. So what if you would like to make the front page of your WordPress site based on a page instead of your blog posts?

  1. Start at the Dashboard.Screen shot of WordPress Dashboard
  2. Navigate to Settings > Reading.screen shot of WordPress reading settings
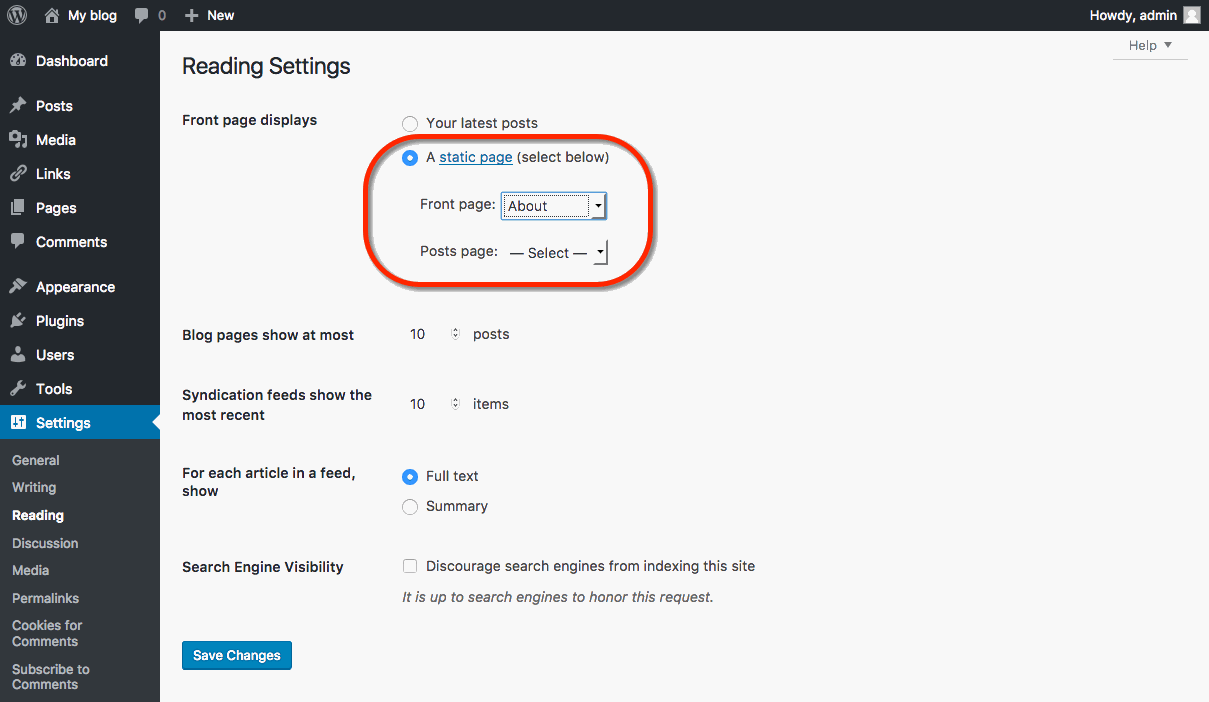
  3. Normally, the front page displays your latest blog posts. What we want to do instead is select a Page from the website. Obviously, this page has to exist before you can select it. Select the “A static page” radio button and choose the About page from the Front page drop-down menu (an About page was created for you when you installed WordPress). Press the Save Changes button and now you will have the “About” page as your Front page. Edit it as you see fit and provide a good welcoming page for your visitors. screen shot of Word press reading settings
  4. But wait. What will happen to your blog posts? Most people will want them as the “dynamic” part of your site. First, create a new Page.screen shot of
  5. Title it Blog (you can title it whatever you want but Blog is common and descriptive). Leave the page blank (don’t type any text in the edit box) and Publish it.screen shot of adding a new post
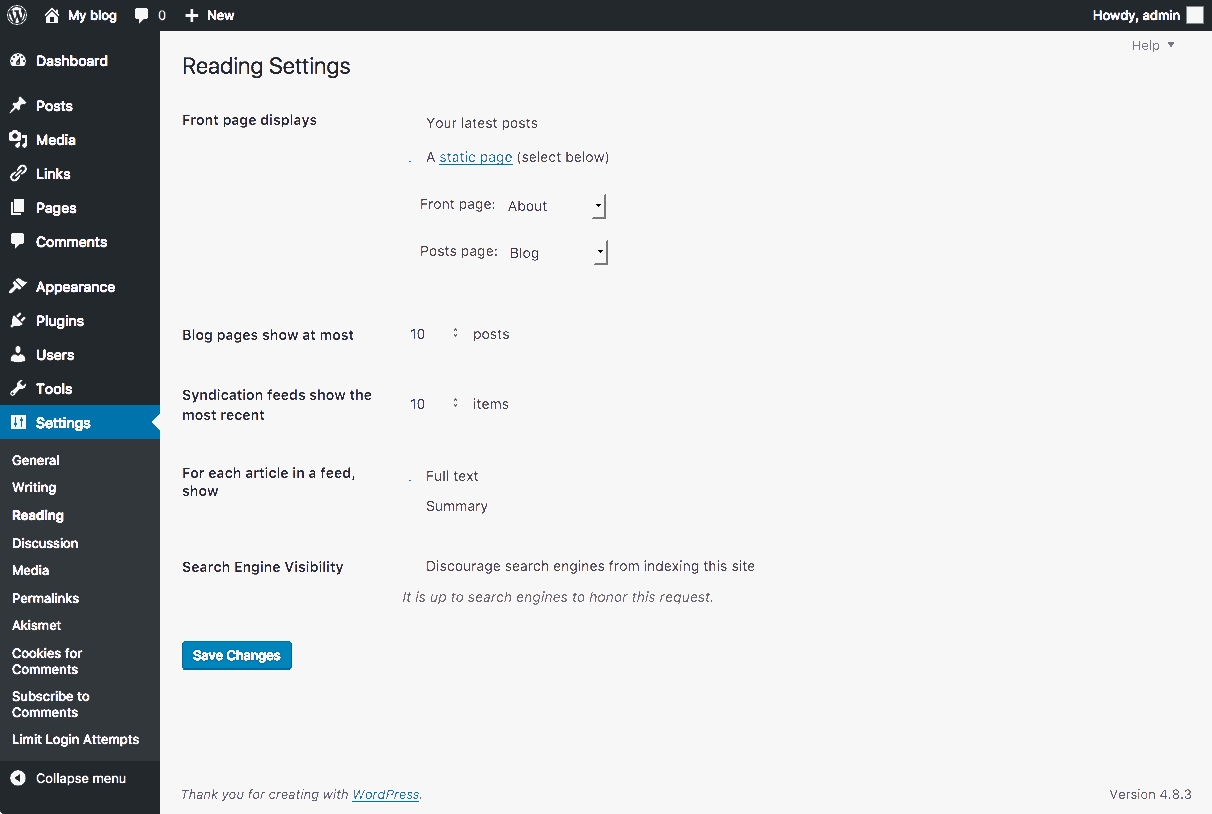
  6. Now go back to Settings > Reading. Under the static page area choose Blog from the Posts page drop-down.select new WP post page
  7. Click the Save Changes button. Now your “home” page will actually display the About page. You will also have a Blog item in your menu (depending on your theme, you may have to customize your page display to see pages).
  8. If you click on the Blog menu item, you will then see your blog posts. Notice the /blog added to the web address.

Publishing Content

The primary activity that you’re likely to be doing on your WordPress site is publishing content. The content could be the text you write, pictures you take, videos or audios (which may be hosted on another site), or other media that you’ve found elsewhere on the Web. WordPress makes it very easy to publish media content of all types, whether hosted on your actual Web server or elsewhere.

Posts vs. Pages

Out of the box, WordPress provides two primary content types for you two work with: posts and pages. If you read blogs or have ever written for a blog before, the concept of a post is probably a bit familiar. Posts often are content that appear on your blog in some kind of scheduled way. They usually are presented on your site in reverse-chronological order. Posts might be what you use to share your regular thoughts, reflections, or ideas about a topic. Posts make up a kind of “river” of content that you’re producing as part of your blogging activity.

Pages usually correspond to our more traditional concept of what makes up a Web site. Pages are presented outside of the “river” of content that are posts. They are more likely to stand alone and be organized according to a traditional hierarchy. Pages might be content that is less frequently updated or changed.

If you were using WordPress to build a business Web site with a lot of information content, you would probably use Pages. If you added a feature to that site where you started to advertise special events or news, you would probably use Posts.

A few other things to know about Pages vs Posts:

  • If you want your content to be accessible to your users via RSS/syndication, you’ll need to use Posts. By default, Pages do not appear in a site’s RSS feed.
  • Categories and Tags (which are used in WordPress to help you organize your content) are ONLY available on Posts. Page organization is done by customizing your site’s menus.
  • Okay, this get’s a little tricky: WordPress, by default, also creates “Category Pages” and “Tag Pages” that display all the Posts in a category or tag. These are NOT related to the regular Page type.

Media

Upon occasion, you may want to include media (images, audio, video) in your site’s posts and pages. There are generally two approaches to handling media in WordPress:

Uploading: You can upload the files to your site’s Media Gallery and then link to them in your posts/pages. This works very well for images, and when you take this approach for images you have the added benefit of being able to make use of WordPress’ built-in (albeit rudimentary) editing tools. Also, when you upload images to WordPress, it automatically creates different sizes that you can use, as needed. This approach works less well for audio and video. In order to have your media files actually show up in a “player” (with controls for stopping, pausing, etc.) you’ll need to install a plugin. Otherwise, you’ll only be able to include links to the files. How people view/listen to them will depend a bit on the setup on their own computer and in their own browser. They may, for example, have to download the media file and then open it in another program on their computer.

Embedding: You can embed media from other sites easily in WordPress. Embedding an image just means providing a URL to its location elsewhere on the Web. Instead of uploading it to the server, WordPress grabs that image from the external source and displays it on your post/page. However, with this approach, you lose your editing capabilities as well as the resizing feature. Embedding audio and video from external sources becomes easier with every version of WordPress it seems. These days, you can embed video and audio from many external services (YouTube, Vimeo, SoundCloud, complete list here) by simply placing the full URL of the audio/video location on its own line in your post/page. There is a complete list of supported external services, and you can learn more about embedding from external sources at the WordPress site. Our general advice is to use externally hosted media whenever it makes sense and works. This is usually the case when you need to use audio or video; without plugins, well-presented audio and video in WordPress is tricky. For images, if you need to do basic editing and/or require different sizes of images, upload them to your site. Otherwise, consider referencing them from another location (your Flickr account, for example).

Post Formats

Recent versions of WordPress have built out a new “post format” feature which, if you are using a theme with the feature enabled, will style post formats differently depending on what they are. The formats that are built-in to WordPress (and are available for theme developers to use) are the following:

  • aside – Similar to a Facebook note update.
  • gallery – A gallery of images.
  • link – A link to another site.
  • image – A single image.
  • quote – A quotation.
  • status – A short status update, similar to a Twitter status update.
  • video – A single video.
  • audio – An audio file.
  • chat – A chat transcript.

Those of you familiar with Tumblr may recognize this approach to post formats.

For the most part, post formats are designed as a way to style a site (and customize styling depending on the kind of content that is being displayed). They have no special functionality, and their use depends entirely upon the theme you are using. Many older themes, for example, do not recognize post formats.

WordPress Themes

When it comes to WordPress, customizing the look of your site is simple and straightforward. When you install WordPress, the default (or pre-set) theme is called Twenty Seventeen (as of WordPress version 4.8). It is a very customizable theme.

You can find general information about Twenty Seventeen here.

In addition to Twenty Seventeen, you’ll have other themes available to you. (What themes you have depends upon if you did a default WordPress installation, or if you installed a special package.) If Twenty Seventeen doesn’t meet your needs, you can activate another theme on your site or install a completely new one.

Activating Themes

  1. Start at your site’s Dashboard.
    Screenshot of WordPress dashboard
  2. Navigate to Appearance > Themes.
    screen shot of WordPress theme options
  3. You will see thumbnail images representing each of the themes that you currently have available on your site. Simply mouse over any one of them, and click the Activate link.
    screen shot of activating different wordpress theme

That’s all you need to do to change the look of your site with a new theme.

Installing Themes

If none of the themes that were provided when you installed WordPress are what you’re looking for, you can always search for and install other themes from the WordPress Theme Repository.

  1. Navigate to Appearance > Themes.
    screen shot of WordPress theme options
  2. Installing new themes is quite simple. You start by going to the Add New Button.
    Screen shot of
  3. The initial page is the Search Theme page, and it’s not visually helpful. You can check a few filter boxes to see what comes up, but there is a more visual way. Click the Featured link at the top and you’ll get visual (screenshot) examples of other themes you can install. You can also click Newest or Recently Updated.
  4. Under the thumbnail picture of each theme (when you hover your mouse over the theme) are three choices – InstallPreview, and Details & Preview. Those choices should be pretty self-explanatory so click Install to add a new theme to your site.
  5. After you install the theme, it is still not active on your site. You will need to Activate it to use it.
    Activate desired theme by clicking

Once activated, your site will be using the new theme. Visit your site’s homepage to view your new theme.

General Settings: Title and Tagline

Now that you have your WordPress installed and running, it’s time to look at some basic settings for your site.

  1. The place that you will access the settings for your site is called the Dashboard, and it provides the starting point for accessing all of your sites dials and knobs.Screenshot of WordPress dashboard
  2. The setting we will look at here is your blog “title” and “tagline”. It is located in Settings > General. Once you’re on the General Settings page, you can give your blog any title you want. You can also give your blog a tagline, which can be a short description of the blog.

When you change the Blog title and tagline, they will show up at the top of your site. Depending on what theme you use, the title and taglines will show up in various places. In the case of some themes, they might not show up at all depending on whether they allow custom configurations. We won’t worry about that for now.

There are more settings on the General Settings page, such as setting the administrative email account, time zone, date format, etc. Change those to whatever is appropriate for your site and geographical location.

Installing WordPress

  1. Once logged at https://digitalscholar.rochester.edu you’ll be at the homepage of your control panel. Scroll down and look under Web Applications, then click the WordPress button.
  2. This page gives you more information about the WordPress software. To begin the install click Install this Application in the upper-righthand corner.
  3. On the next page, the installer will ask for some information about this install. The first thing you’ll want to do is decide where to install it. For example, you could install it in a subdomain you have created by selecting it from the drop-down menu. You also have the option of installing WordPress in a subfolder by typing in the folder name in the Directory field. Click here for more information about subdomains.
  4. By default the installer will automatically backup your website and update it anytime a new version comes out. While we recommend you keep this option, it is possible to only do minor updates, or turn them off completely. The installer will also create a database for you automatically, but if you’ve already created one for this website you can choose Let me manage the database settings and enter the details. Finally, you’ll need to create an initial username and password for the WordPress install. Enter that information in the final section and click Install.
  5. The installer will take just a few moments to install WordPress and a progress bar will keep you updated. When it is complete, you will see a link to your new WordPress site as well as a link to the backend administrative section for your WordPress site.

Congratulations, you’ve now installed WordPress! Now you can start customizing it with themes, plugins, and more.

Migrate to Reclaim Hosting

Step One: Signing up for an Account

The first step will be to sign up for an account at Reclaim Hosting. This link will take you directly to their Student/Individual Hosting plan option.

-If you already have a Top-Level domain (i.e. yourdomain.com) choose the I will use my existing domain and update my nameservers option.

-If your current website content exists on a subdomain (i.e. yourdomain.digitalscholar.rochester.edu), select the Register a New Domain option.

-Enter a new top-level domain name

Complete the sign-up process/pay invoice. If you’d like to take advantage of a 10% discount, enter the promo code reclaim4edu.


Step Two: Let Reclaim Hosting Know

Send a support request to support@reclaimhosting.com with the following message:

Hello Reclaim Hosting Support,
I am graduating from (your school) and I would like to migrate my account, (your domain), to Reclaim Hosting. Please let me know if you need anything else from me.
Best,
(Your Name)

A member of Reclaim Hosting support will respond & help you get your account migrated within 24 hrs.

When You Leave

There are a few reasons that could lead you to consider exporting your website content from University of Rochester. Perhaps you’re leaving the University, or maybe you’re just wanting to use your data on another hosting environment. Whatever the case, you have a couple options for how you want to handle this:

If you are leaving the college, you can migrate your webspace from University of Rochester to our hosting provider, Reclaim Hosting, for a discounted price. Detailed instructions can be found here.

If you would like to move to a third party service, you’ll want to capture a backup of your site. From there you’ll be able to import this backup into a handful of other web hosting services. You can find instructions on taking a backup here.

Unlock your domain

This article only if you own your own top-level domain. If you have been using the free subdomain option with digitalscholar.rochester.edu through University of Rochester, this does not apply to you.

Similarly, if you’re migrating your content to Reclaim Hosting, this article does not apply to you.

Transferring a domain you already own is not too much different from registering a new domain, except the transfer process requires an EPP code, or an agreement code between your old registrar and your new registrar that allows the release of your domain. Your new registrar will have information on how to transfer in a domain. When you start that process, you will be prompted to enter your EPP code.

How to find your EPP Code:

  1. To get started you’ll need to login to your control panel (https://digitalscholar.rochester.edu/dashboard) using your Haverford username and password.
  2. Once you’re logged in, you’ll see the cPanel interface.  Now click on the Manage Your Account menu at the top of your screen and select Migration Information.

3. Click the Lock button to unlock your University of Rochester account.

4. Click Get Code. Once that’s done, the system will send you an email with your EPP code.

At this stage, here are a few items to note:

  • You’ll receive a series of emails from both your old and new registrars asking you to authorize the transfer. Please act on every email you receive in a timely fashion– even if the emails look like duplicates.
  • If you do not authorize the transfer in a timely fashion, the domain transfer will expire and you will need to start over.
  • The domain must be older than 60 days.
  • The domain must have no other transfers in the last 60 days.
  • The domain transfer process can take up to a week, depending on how fast your registrars work.
  • Once the domain transfer completes, you’ll receive a notification.

Export your domain

To export your domain, we will create a backup of both the files in your domain and the databases that your domain draws from.  First, click on the ‘Manage Your Account’ menu at the top of your screen and select ‘Migration Information.

  1. To get started you’ll need to login to your control panel (https://digitalscholar.rochester.edu/dashboard) using your University of Rochester username and password.
  2. Once you’re logged in, you’ll see the cPanel interface.  Now click on the Manage Your Account menu at the top of your screen and select Migration Information.
  3. To create a backup of your files and databases, simply click the button labeled Add Backup. The system will take a moment to create a backup. When it is complete, you will see the new backup appear below the button. You can click on this backup to download the file.